We just purchased our first home in a small, quaint and charming little town in northern Wisconsin. Let the fun begin! While raising our six blessings, we are going to attempt to revitalize our cozy Dutch Colonial Revival home. Follow along and see what we learn, discover, and overcome in the process. It is sure to be a houseful of laughs!

Showing posts with label Dining Room. Show all posts

Friday, November 9, 2012

The Mystery House

This house has been a mystery for us ever since we bought it. We knew it was built in the 1920s but finding a set of floor plans has been very frustrating. In some ways, the house is similar to a bungalow, yet it has a gambrel roof and two shed dormers. Regardless, some of the mystery has been solved with the removal of the drywall ceiling.


Case in point, the kitchen. This is what the kitchen looked like when you stand with the bay windows to your back. Not bad, if you like laminate flooring, cheap counter tops, and care absolutely nothing for the historical integrity of the house. Trust me, it looks much better in the picture than it did when we actually moved in.

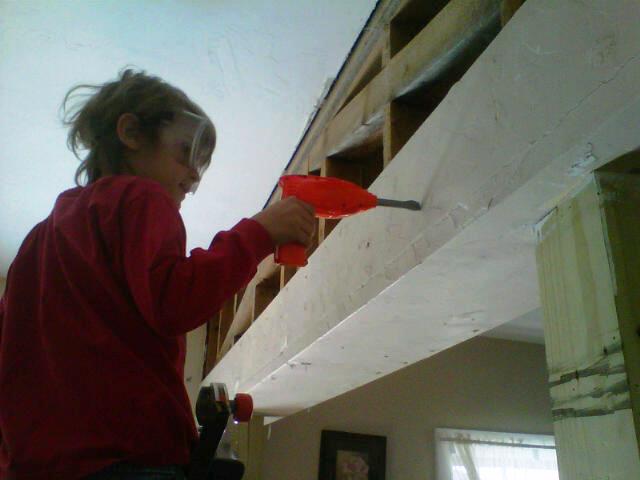
Yesterday, my husband removed the funny counter top from the half wall and continued removing the drywall ceiling. In the process, we discovered some new mysteries and solved a few old ones.


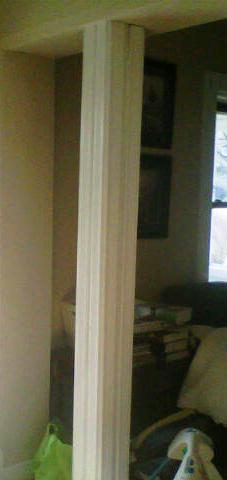
And now you can see it without the counter top. This should also show why that half wall should really be a full floor to ceiling wall. Anyone walking into my house gets to see the messiest parts of the kitchen! The sink and stove are directly in the line of sight from the front door. Not good, at least for an OCD person like me. It drives me crazy and I can't wait until the wall is put back....but more on that later.


One of the new mysteries is why was this floor chopped up and then fixed with cheap wood? If you look really closely, you can see the cuts made into the maple floor by a circular saw. But why? By reviewing the ceiling in the basement and looking closely at the floor, we have determined that a heat vent was in this wall at one time and was used to heat the dining room.


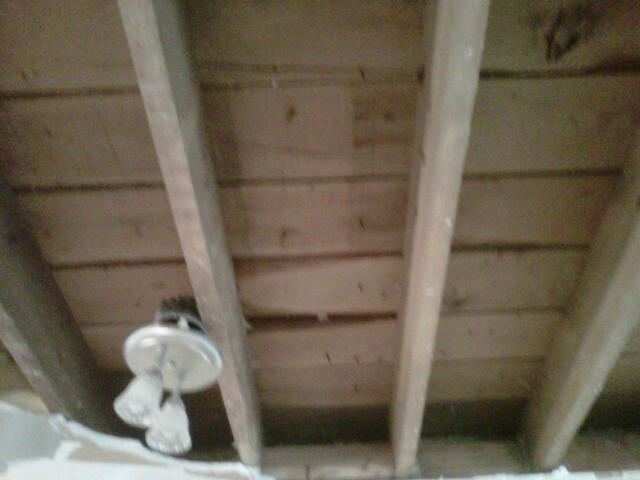
By examining the ceiling above the half wall, we were able to see evidence that there was in fact a wall that went all the way up to the ceiling. And you can also see that the wood blocking in the ceiling perfectly lines up with the missing floorboard under the half wall. One of these days, that wall will be put back.

As for other mysteries, we are still fighting bats. Yet another one got into the house last night and was quickly dispatched by my knight in shining armor. A second and third bat were heard later in the evening, but we could not find where they were hiding. We are praying that we were hearing them leave the house! Unfortunately, my husband heard yet another one in the walls early this morning. Maybe I should change the name of this blog to The Bat House! 

Some time ago, we had another little unsolved question. We had mysterious pools of water on the bathroom floor in the lower half bath. Not enough to splash, but enough to be absorbed by the dropped toilet paper rolls and paper - evidence that one of the kids used the last of the roll. We could not figure out where the water was coming from and suspected that our youngest son was maybe "missing the target"! The bathroom constantly had an outhouse odor to it too, no matter how often I cleaned the floor. It was all very frustrating.

And how do we solve mysteries in this house? With small scale demolition of course.


Do you see what I see? There is a slightly old, but drier water stain that runs the perimeter of the bathroom. We suspect based on evidence of water in the basement and in this bathroom that there may be a leak in one of the pipes in the full bath upstairs. This bathroom is of course located directly above the lower half bath. You can also see that we have a major water issue with the current toilet.


In this case, we are suspecting that the wax ring has failed for some reason. There is no logical reason for its failure - this house was allegedly completely remodeled a year before we bought it. The people that flipped the house either did not know what they were doing or were attempting to cover myriad issues. Needless to say, my husband is not real happy at this point.

On to more pleasant things. As part of our home restoration process, we spend a fair amount of time checking out various sites for replacement components. Specifically, Ebay and Craigslist. Today, my husband found the perfect set of wall cabinets for sale. Unfortunately, the price is not so perfect for us right now. But I can still hope and pray! As a back up plan, I saved all the pictures so that we could, as a last resort, have our wonderful Amish woodworker reproduce them.


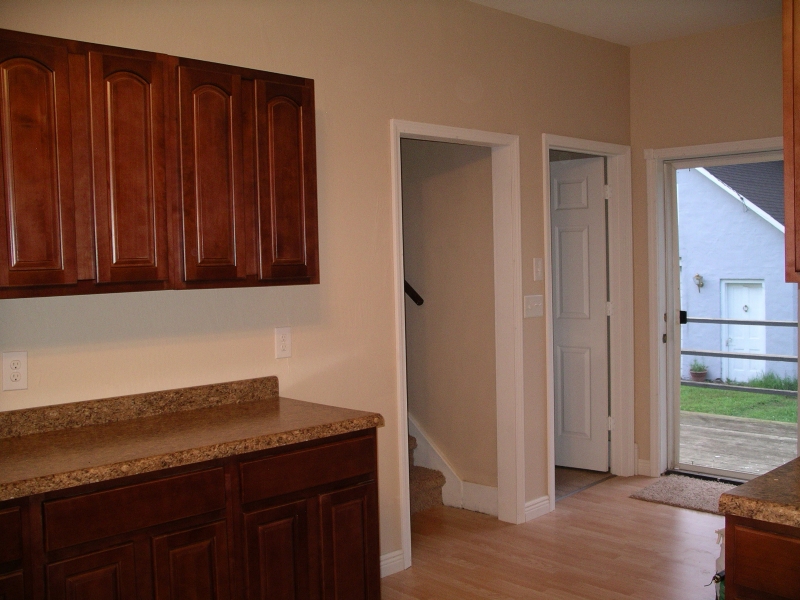
Here again are some photos of the kitchen when we first moved into the house. While these cabinets look nice, they are the cheapest money can buy and still have the alphabetical assemble-yourself stickers on them! No wonder they are already falling apart. Anyway, this space is very long and fairly tall. My husband found an original set of 1920 kitchen cabinets for sale.


Aren't they absolutely gorgeous! What was even more amazing was how the measurements exactly fit the space we have available. Now, if we can just swing the financial end of it before some else! I really like to the two bins and the five drawers. As for the space between the two sets of upper cabinets, I would fill that with some matching open shelves for storing my prettier dishes and apothecary supplies.

We also found a lead on a collection of 1920 farmhouse doors for sale. There are between 15 and 18 of them available, and some of them even have the original hardware. For some reason, when the house was flipped, they yanked out all the original doors except for the three closets in the bedrooms and the pantry door that we rehung a few weeks ago. It would be a true blessing if we could source all the doors from the same place and start replacing the nasty modern ones. Here are some pictures of the doors that I am drooling over now....


Now, lest you think that all we do is destroy our house, I thought that I would end today's post with some of our accomplishments. I don't know how many of you remember this?


This is a picture of our kitchen floor, after we removed the laminate flooring. I am proud to share that we have finally finished removing the black adhesive. Now, our kitchen floors look like this....


Of course, it still needs to be sanded, stained, sealed and finished properly. But, in the meantime, we are really excited and pleased with how good the floors came out. We still have to finish the side entrance and then two of the bedrooms upstairs. Overall though, it is looking good!

Thursday, November 8, 2012

It's Hammertime....

Anyone that thinks the pen is mightier than the sword has not seen my husband swing his hammer with such deadly force. For some reason that I did not fully understand, my husband decided to continue removing the ceiling above the dining room last night - three hours before we had to leave for church. I give the man credit; he got it done in time for me to make dinner and we even left for church a few minutes early.

But I digress. As he was removing the ceiling, he saw what he thought was just a big pile of a dust bunny. All of a sudden, he started teetering on the ladder - I thought he lost his balance or something. I mean, he looked so comical flailing around, but then he started yelling for the hammer. Apparently, the dust bunny was actually alive and turned out to be yet another bat.

Whack with the hammer and that bat was no more. Ugh....only our youngest son seemed excited by it all. He spent the rest of the time singing and dancing around the house talking about how we had seven bats but now we have eight. All I can say, is I am sick of these bats and I really want to know how they are getting in the house so that we can permanently close up their access.

Monday, November 5, 2012

What Were We Thinking....

Sometimes, I really wonder, what were we thinking...as in, what were we thinking when we bought this house? Or, what were we thinking to start this project? Case in point....

In our last post, I showed the panel wall that we opened. Remember this?


In that post, I forgot to mention that we plan on replacing the "wonderful" outdoor support beams with a reproduction of the built-in bookcases that someone chose to remove. We found an example to give to our wonderful Amish wood crafter from in the Antique Home site. Here is a the picture for you.


But I digress...back to the question of the day. One would think that we would stop with just the plywood wall, but of course not. The deconstruction continued...to the ceilings. This time, though, I wised up and made sure to improvise some drop cloths to protect the furniture from the dust - especially my 1911 upright grand piano.


Taking down the first ceiling was not bad at all and we were pleasantly surprised to see how clean it was up there. Of course, we did discover a few unanticipated things too.


A pipe runs from the outside wall of the house to the center of the room, and has old wires still in it. It is my educated guess that this pipe originally held gas for gas lights, but was then converted to knob and tube electricity at some point and then replaced finally with modern electric lines.


Here is a picture of the rest of the pipe. As you can see from this photo and the ones following, the ceiling looks really clean.


I am sure you are wondering what we are planning on doing? Well, we decided that we really like the extra seven, yes 7 inches of height that this gives the room. And, since we have no idea how any of the rooms were originally finished, but we do know that the house was built as a showplace, we have decided to go all out and really dress it up...with finished beamed ceilings.


Something along the lines of the ceiling above. We have decided to also go for this look in the dining room. We thought that this would help expand both spaces and make them feel larger and more formal. It was while starting the ceiling in the dining room that we found stuff that was not as clean or appealing.


Things like swarming nests of creepy crawling lady bugs. Now, don't get me wrong, I don't necessarily have an issue with lady bugs. They are great for my garden. However, I detest little critters of any kind (excluding children :-) of course) anywhere in my house! It just gives me the creeps. But that was nothing compared to the other "evidence" we found.


We have had so much trouble with bats in the house this past summer. If my memory serves me correctly, we were upwards of seven of them to-date. Well, we now believe that they have been somehow living in our ceiling! There was plenty of evidence since we seem to have excavated their "outhouse"!


All over the drop cloth that we used to cover the computer desk and equipment. (Uhhh, to think that this was above me each and every day as I worked!)


The insulation was absolutely coated with their excrement. I refused to touch the stuff to begin with due to the fiberglass fibers, but I really draw the line at poop!


Unfortunately, we were caught off guards and were not expecting this at all, so a bunch ended up on the floor. We cleaned it all up, but then had to stop. We had run out of garbage bags to contain it all and did not want to remove any more insulation and have it laying around. Especially with a baby that is in to everything these days!


Our final disgusting discovery was this dehydrated baby mouse. Fortunately, my husband saw it before it landed on me, the kids or the floor! We were able to divert this little critter right into a bag and out the door.

We are frustrated and discouraged for many reasons. Was buying this house the right decision? We feel that in part, we were misled by the quality of the "remodeling" work done. We were told that all the rooms had been completely gutted, insulated, etc. Well, it appears that the above statement is only partially true at best. And what work was done was of such inferior quality that we don't think we can trust any of it. Plywood walls? Really?

At least I can be thankful that our children are learning a lot of valuable skills - like using a hammer, safety glasses, and how to safely climb a ladder!


I can only pray that they will look back on their childhood home with fun and fond memories. Hopefully, they will also learn a lot along the way. Especially what NOT to do!

Friday, November 2, 2012

Deconstructing the Plywood Walls

Shortly after we bought our house, we noticed that the walls above the pillars located between the living room and dining room were made of plywood. Yes, plywood. Initially, we discovered this because we noticed a crack in the wall and since this is right below the master bedroom, we were worried about the stability of the second floor.


You might remember this picture from one of our previous posts. When we bought the house, these white "pillars" were covered with baseboard.


We had removed the baseboard, but left the ceiling alone for the time being. That is, until  today.


The first thing we had to do was to identify where all the screws were that attached the plywood to the wood studs and supporting woodwork. My poor husband really had his work cut out for him on this project!


Once the screws were removed, he attempted to pry out the plywood pieces, uses a hammer and crowbar. Unfortunately, as you can see from the picture below, the hammer just up and quick!


However, we were not deterred and continued the slow and tedious process of removing the plywood. Not only did we have to remove a lot of screws, but we also had to strip out the drywall netting used for the top and side seems.


When the first piece was finally removed, it only made us more anxious to remove the rest.


We continued to work on it for a while, but then stopped for the night.


 We probably could have kept going, but a slight mishap with the ladder resulted in a bruised and swollen ankle. My poor husband did quite a number on himself. But it was back to work bright and early today - but with some extra "help"!


Mommy was starting to get concerned about the safety of the little man, and so it was time to get some protective gear on. Daddy was more than happy to donate his. Thank you Daddy!


With master craftsman DJ giving a helping hand, the job seemed to go so much faster.

 
Not really, but he was so proud of being such a big "helper" working on the house with his Daddy!


And DJ taught us a few things too. This whole time, I thought those funny loops on blue jeans were called belt holders for a reason - such as holding your belt. But I have been corrected in the error of my thinking. Apparently, those are crucial for holding your necessary tools! Your pockets provide some additional holding capacity too.


It was surprising how many screws were used to install the plywood wall! And of course, they had to use two different types of screws, so my dear husband was always having to switch between a star bit and a phillips bit. It was my job to hand him the drill with the correct bit and collect the screws as he removed them. We managed to collect quite a few of them to use on other projects around the house.


Here is what it looks like now that it has been all deconstructed and cleaned up. I love the look of the beams and the amount of light that transfers from the dining room into the living room. It gives it a feeling of more space too.


One of the things that was really popular in the 1920s was the use of stained glass windows. I am thinking about incorporating them in a few areas of the house, including this space. Now, the picture below is only to give a visual conceptual idea of what it is that I am thinking. Of course, we would get a professional to actually design the glass the glass to specifically fit our space. But at least, this way, you can see what I am envisioning.


Don't you think that it will make this space absolutely stunning! I do. :-)

Saturday, November 26, 2011

Our Black Friday Purchase

We closed on our first house yesterday, which just happened to be Black Friday. And of course, we could not wait to get started on all those "want to fix" home projects. We decided that the first area to refinish is the main stairwell between the first and second floor. This was carpeted with a heavy shag beige carpet. And of course all the trim has been painted - white!


One of the fascinating things about fixing up your own home is the odds-and-ends that you find during the process. Of course we did not expect to find anything our first night! For some reason, the stairs have an air vent on the second stair. We are not sure why as it is not connected to anything - like furnace ductwork. While looking around behind the vent, we found...a single black tennis shoe and a wig. Weird. We can't help but wonder if the other shoe might appear somewhere else.

While taking a break from the stairs, we also exchanged the upstairs hallway light with the downstairs dining room light. Here is a picture of the old dining room chandelier which now graces our hallway.


And here is the old hallway chandelier which now graces our dining room! Much better, don't you agree?


It will be interesting to see what we can get accomplished next!